Category Archives: A New Homestead

Setting up for chickens

It’s spring and time to get busy on the flock of chickens. Is it time to start your first flock of layers? Or maybe some of your older hens need to be retired and replaced. Homesteader’s Supply has the equipment you need to get going or add to your equipment.

chick daysThe Small-Scale Poultry Flock


A little time spent reading before bringing your chicks or chickens home can save you some heartache and back break. We have books you’ll find to be helpful whether you’re just beginning or have been raising poultry for years. You’ll find all of them listed here.

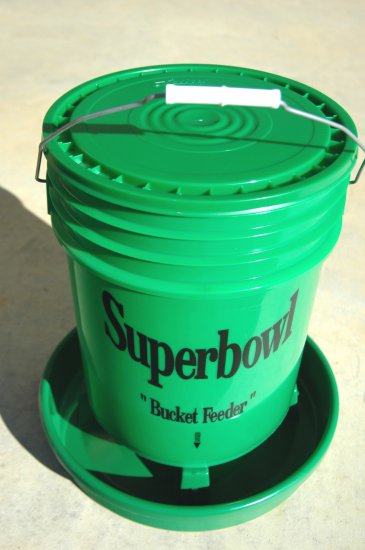
Superbowl bucket feeder for poultry

Holds 50 lbs of food

The Superbowl bucket feeder holds up to 50 pounds of food, decreasing trips to the coop with more food. It’s easy to fill and can be hung up or placed on a base to discourage hens from scratching their food onto the floor.

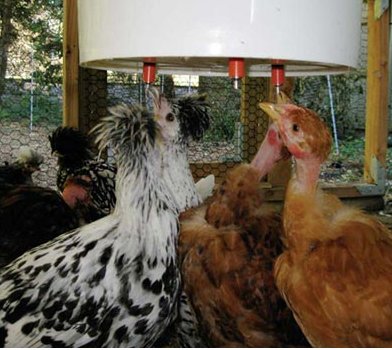
Poultry can make a mess of their water quickly by stepping in it and throwing dirt in when they dust bathe and scratch. Suspend a bucket fitted with Poultry Nipples. There’s no pan needed because it doesn’t drip. It’s also excellent for ducklings that are prone to getting soaking wet (the way ducks do…) and cold.

Poultry Nipples

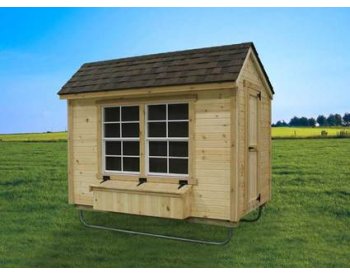
EZ-fit Chicken Coop 5ft X 8ft

EZ-fit Chicken Coop 5ft X 8ft

The EZ-fit Chicken coop will provide a safe, secure place for your poultry. It’s available in three sizes. Shipping is free to the lower 48 states!

The optional skids make moving your hen house to fresh grass easier. The skids don’t get stuck in ruts as easily as a tire will. They’re also a good way to keep the coop off off the ground. Hens bring mud into the coop on their feet. A ramp helps remove some of the mud, helping to keep not just the coop but the eggs cleaner.

The nest boxes are located on the outside of the coop for easy pick up and nest box cleaning. Other features include:

  • Chicken Door & Ramp
  • Inside Roost
  • Predator-resistant Wire Mesh
  • Man Door
  • Window(s)
  • Standard window color is white
  • 25-Year 3-Tab Shingles
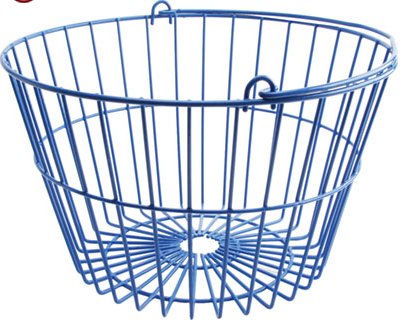
Egg basket

Egg basket

Our egg basket is coated with plastic to help keep it clean, and make the clean up it will eventually need easier.

Dimensions: 14″ top diameter x 9″H x 10″ bottom diameter.

You can see our entire line of poultry supplies on our website.

Dealing With Ice Dams On The Roof


A few weeks ago, we were in the path of winter storm Draco. Our new little homestead was hit with 18 + inches of snow in a twenty four hour period. We spent all day the first day barely keeping up with the falling snow as far as driveways and access paths to the barn and pastures. We started the snow blower up at about 9 a.m. and finally went in to eat soup at about 6 p.m. that night. This photo is after the first 8 inches fell and was phase one of snow removal. The snow was a wet and heavy snow… with rain falling about mid day. Cookie and Do spent most of these two days in the barn. We had several extra barrels filled with water in their stalls just in case the electricity went out and the well couldn’t feed their automatic watering unit. We felt very prepared, knowing this storm was set to hit our area of Wisconsin especially hard. We had hay stacked up in the barn and plenty of supplies stocked to get through some time not knowing how snow removal would be up here on the ridge.

The planning and preparation were well worth the time! We were only snow bound for two days and never did lose electricity for more than a few fleeting seconds. Everyone did great. The horse’s blanket was soaked after the heavy wet snow, so we took it into the heated garage and draped it over some saw horses – by dinner time it was dry and ready for the single digit night time temps that were predicted for that evening.

The one thing we didn’t think of was how wet all of that snow was on the roof. Temps dropped so fast that night that by the next day the snow on the ground was light and fluffy. It was a week or so after the snow that we noticed the ice dam up on the roof of the house.  The snow on the shingles was so wet that when the temps dropped so quickly, the bottom layer created a thick blanket of ice over the roof.  This can cause all sorts of issues… damage to the shingles, water leaking into the attic space and with wet insulation there is the possibility of mold forming up in the attic space.  After some reading and research we went to Farm and Fleet and purchased a 22′ snow rake.

What a wonderful invention that is!!!

The pole extends to the length needed to remove snow built up on the roof. We set the length of the pole to remove 4′ of snow from the edge of each roof. Once that was done we realized the issue on the cabin. We had an ice dam of about 8″ thick at the edge of the roof line. The garage was just snow, same with the barn, but the cabin had quite the ice dam. The funny part was that it was only on the east side of the house. The west side was just snow and easily pulled down with the snow rake.

We have a spigot on the side of the cabin that is tied into the hot water heater and that was a blessing!!! Yesterday, after the snow was all raked down, we hooked up a hose to that hot water spigot and slowly worked at melting off the ice dam before it took down the gutter or started leaking into the roof of the cabin.

The first thing we had to do was thaw out the down spout, which was frozen solid. it took some time but soon was flowing freely and we were ready to start on melting the dam. The articles we read explained that all is needed is to get some shingle clear so the sun can melt off the rest of the ice. We raked up about four feet and then made sure to have 6″ of shingle completely melted  of ice. We took our time spraying off chunks of ice in about 2 foot sections. I cut through the sections with the hot water and Matt pulled them down carefully with the snow rake.  It was a very WET and cold job, but with insulated bibs and several changes of coats / gloves… I didn’t get too chilled. Be sure to spray the concrete with hot water to get a good grip with the ladder feet… it was slippery a bit until we sprayed down the concrete.

As of today, the snow up on the roof is still there, but what has melted is now flowing down into the gutter properly and draining off without issues.

I’m sure it was just so much snow and so wet that it created a perfect situation to create an ice dam!

Happy homesteading!

If you’d like to see more pictures from the storm… please visit our facebook page… there are tons of photos!
https://www.facebook.com/HomesteaderSupply


When A Bull Comes to Visit…

We had to dry Cookie cow off for the move from Arizona to Wisconsin and now that we’re here… we are all going through milk withdrawal! Cookie has had over four months to acclimate and is doing very well. We decided it was time for her to have a friend come and visit. The man we bought hay from has a nice size herd of beef cattle and said he had a few too many bulls now that everyone has bred their cows. He offered to bring a young one over for a few months to visit Cookie in hopes that we’d keep him all winter.
As bulls go… he’s as sweet as can be! That being said… HE IS STILL A BULL! We are very mindful of where he is when we are feeding, mucking stalls and scooping poop in the pasture. We have two paddocks and a cross fence between the arena and the big pasture. If we are doing anything that requires focus… we lock up the bull first.

I wasn’t always so aware of bull behavior. About four years ago I had a bull come to visit the girls and one day when I let them in for milking, he darted in right with them. In the confusion of two hungry cows full of milk and a feisty bull, I was pinned up against a metal gate and couldn’t move out of the way. The bull had stepped on the toe of my boot and I was unable to move my foot at all, let alone get away from his head. Luckily he was naturally polled so he didn’t have the horns with which to skewer me, but he did pound me into that gate a few times before I was able to get a hold of a shovel and thump him in the head to back off! It took some time to heal my lower back from that pounding and I’m thankful it wasn’t a more serious injury. Bulls are necessary for those who choose not to go the artificial insemination route and an ounce of knowledge is worth it’s weight in gold!!!!
When it’s time to breed the cow, don’t be afraid of having a bull come to visit. Instead, I’d urge you to plan ahead. Have pens available to lock the bull into so you can spend time with your cow and clean up without having to have a ‘look out’. Being safe and planning ahead will make the process a fond experience. Now, it’s time for me to go and lock up our visiting bull and clean up some poop!!! Wishing you all a great Sunday.

Happy Homesteading !!!!

More on Turning a New House into a Homestead

It is a beautiful fall day on the new homestead out here in Wisconsin. Rain has been falling for the last two days and the temperatures are cooling down to the mid 50’s during the day and mid 30’s at night. The leaves are now brilliant shades of yellow, orange, red and browns. I took these pictures about an hour ago to share how the barn floors are working out and had to share this one of Do out in his pasture.  Now, about the barn floors. We kept the sand we’d ordered in and moved over 7 yards of sand to build up the two big box stalls and a center stall between the two box stalls. The stall that the horse uses needed much more build up and was like walking on a beach. Each step was quite a bit of effort so we talked to some folks, did some research and finally decided to go with a friend’s advice to add shavings to the sand. This firmed up the footing tremendously!!! It’s super easy to keep clean too. We bought a 10 tine manure fork and the sand / shavings drop through and the manure, whether cow or horse, stays on the fork. Clean up takes minutes per evening, especially when they spend so much time in there on these rainy days! We added a total of four bags of shavings to the horse stall and two bags of shavings to Cookie cow’s stall. Her stall required about half the sand as what was needed in the horse stall. We have less than half of the sand pile left and when it dries out a bit after these rains, we’ll bag up 2500 pounds into sand bags (we bought 50 bags which will hold 50 pounds each) We plan to hang onto this for future projects and will toss a few in the back of the truck for traction this winter. I do believe we will call this sandy learning experience a success. The urine drains down well and dries up quickly while the barn still smells of pine bedding. We’ve done some other small projects over the past few weeks. We trimmed up several trees that were weighed down by heavy, low level limbs. We also got our hands dirty with some plumbing projects. My brother is out visiting from Arizona and showed us how to sweat copper fittings with flux and soldering. We had two valves that wouldn’t completely turn off and he gave us a DIY plumbing lesson on changing out the valves to a better type of water valve. The project was a leak free success! Now, we are all ready to enjoy a home made pot of chili that I made earlier today along with some fresh corn bread!
Happy Homesteading and I hope you enjoy the pictures below!
Nance
The horse stall with shavings mixed into the deep sand base.
Here is the other end of the horse stall. We have rubber mats down for him to eat his grain on.

This is Cookie Cow’s stall. It didn’t need quite as much sand (about half)

Here is the other end of Cookie’s box stall. She’s been bedding down in here at night now that it’s cooler.

Here is Cookie in Do’s stall (they were both in here) waiting out the rain today.

Preparing For A New Winter!

The trees are turning, revealing amazing fall colors of reds, yellows, pinks, oranges and browns… the garden survived the first frost and is winding down production. We built up the box stalls in the barn to ensure that the cow and horse had a warm and dry place to bed down at night. The days of fall are getting colder and shorter.
We’ve been in Wisconsin for about three months now and it’s already time to start planning for the coming winter months. We talked about what it is we’ll need to get done before winter and I realized, as the discussion went on, how different the climate in Wisconsin will be from that of Arizona. In Arizona, we’d get snow… sometimes at least a foot in a good overnight storm, but it would typically melt off in a day or so and while it was cool outside, it was rarely bitter cold. I am thinking that those mild winter days are behind me with the move to Wisconsin! So, today’s blog will toss around our winter planning ideas and I would encourage hearing from all of you on how you’re planning for your winter months.

130 bales of 2 string hay plus the loose pile

First item on our list was to ensure a good food supply for Do and Cookie cow. We did end up finding a great resource for hay. We purchased about 100 bales of Alf-Alfa and about 30 bales of grass hay.We hadn’t been here long enough to find a resource for used pallets… so for this year we used two 12′ x 5′ corral panels as an air gap beneath the pile. I am hoping it is enough to keep it from molding. So far, the bales we’ve fed have been lush and green with zero mold smell or evidence of too much moisture. We did stack this in the corner of the 30 x 60 pole barn / garage. One thing completed on our list!!
Today’s big task is to go through the barn and garage to pull out anything that can’t tolerate freezing temperatures! I use Espree Aloe Herbal Fly Repellent on the cow and horse… this doesn’t tolerate freezing well so I’ve made a livestock shelf in the basement for this and other items I’ll pull from the tack room. Ivomec, Blu Kote, etc… Really, any liquid items in your tack room should be pulled for the winter months to avoid container splitting or reducing the effectiveness of the product.
Tack was another question that popped into my mind, though from what I’ve read on many forums, a good oiling in the fall and covering your tack will keep it safe from damage through the cold months.

Heated auto fill  water source

Water sources for Cookie and Do are another consideration for the Wisconsin winters. We have a heated water source. It’s an auto fill, tied directly to the well, and has a heater inside the housing to keep the water from freezing. While I am comfortable with this, and love that it has access from front and back (though not visible in the picture)… I’m thinking I want a back up water source in the barn. In Arizona, I used  a large metal garbage can that I purchased specifically for a back up water source. I put a large rock in the bottom and set a submersible heating element on top of the rock. I used the rock just to create a larger heat source. We had temperatures in AZ that would dip to -9 degrees and this stayed at 40 degrees. As long as I can make sure that the furry kids have access to water, I’m happy!!!
So, in summary… the furry kids have a warm place to sleep for winter… plenty of food…. and a good water source. All items that can freeze have been removed from the tack room and into the heated basement. Tack has been oiled and covered for protection. Have I missed anything that you can think of???
Happy Homesteading and I hope you all are enjoying the hot cider and amazing fall colors!!!

Nance

Barn Stalls Update… and a Give Away!

Sand… Sand… and more Sand!!!! Ok, if you ever have the notion to buy 13 yards of sand… DON’T DO IT!!!! So, now that I didn’t get that advice in time… we have 13 yards of sand to deal with!! I ordered it to fill in the box stalls in the barn. They are dirt floor and after many years of poop scooping the stalls were about 8″ too shallow and a bit bowl shaped. After adding about 3 yards of sand to the first box stall, we found the flooring to be too shifty… Cookie and Do’s hooves sunk in the sand and Do seemed to be a bit unsteady on his feet. We needed to add something to the sand to keep it from shifting beneath the hooves. We pulled up the stall mats and raked the stall level and smooth again. After many chats with others who own livestock, we decided to go with the advice to add shavings to the sand to help firm it up and create a stall floor that they can bed down in this winter and will wick away moisture.
Once it was all raked smooth, we added three bags of shavings and it did make an immediate difference! The horse walked in and his hooves were solid on the shavings and didn’t sink down into the sand! All was wonderful… UNTIL.. the cow came in… I will post a few photos below to give you an idea of the happy cow dance… Seriously, she made a mess, but didn’t hurt the added stability of the floor with the shavings mixed into the sand. We have since added the sand foundation to two more stalls and just have to add the shavings . Keep reading after the pictures for some give away fun…

Here is Cookie diving into the shavings… notice the horse looking over like “What the HELL!!!”

Now, she’s really blending the shavings into the sand… and the horse with bad fetlocks is staying way out of the way!!!!

So, as you can see… the cow loves the changes to the stall!!! While we continue working on the barn we need a bit of help from you… WHAT ARE WE GOING TO DO WITH ALL THE EXTRA SAND????????????????

Some ideas we have… fill sand bags and put them on a pallet. We can load them in the back of the truck for weight this winter and traction should we get stuck in the snow… actually, we’ll put some in each of the three vehicles..

Other idea provided by my son Matt… HORSE SHOE PITS!!! so now we are trying to figure out a location for those…

As for the give away… I have a 3 pack of Pickle Pro lids for the best suggestion on what else we can do with the sand. We only have about 6 yards left – maybe 5 by the time we fill sand bags…

I look forward to reading the many ideas and suggestions!

Happy Homesteading from the great state of Wisconsin!!!!